Friday, October 29, 2010

Happy Halloween!

10 29 10 ghost I’m frantically trying to finish a bunch of things today – mostly for the Irvington Halloween Festival tomorrow – and still make it to dinner with my husband’s family tonight.  Here’s a quick rundown on what’s going on ‘round here!

It looks like I’m going to be travelling to some other blogs in the next month or so.  I’ve (tentatively) got a guest post at some point on one of my fave blogs, and a giveaway from my Etsy shop on another blog that I’ve recently fallen in love with.  I’ll give you more details when I know for sure both are going to happen.  Don’t think I’m abandoning the ol’ homestead, though – I’m planning a crafty-related giveaway for you guys here, too!

Our pumpkins turned out AWESOME this year!  We are cheaters and use the stencils and pumpkin carving tools.  The hubs did the cat, I did the Jolly Roger, and Bridget did the cool star-jeweled one.  The kit she used was really cool – it had these little pegs (kinda like a Lite Brite) that she hammered in with a hammer.  It was a little safer for a three year old than mini-saws and she loved it.
 10 29 10 pumpkins
This week was my totally my lucky week.  I won this huge witch and two of giant vampire Halloween wall clings from Martha’s Crafters on Twitter.  B’s scared of them, but I think they’re way cool.  Then, I won a swag bag from Prudent Baby on their blog giveaway in honor of Jaime’s new book!  I should buy a lottery ticket, right?

Custom orders are coming in like crazy, which is part of the reason I’m so busy today.  I REALLY need to learn it’s okay to tell people it will be longer than a few days for custom orders.  I always feel like I need to do them RIGHT NOW which is just silly.  I would be much less stressed about getting ready for the show tomorrow if I had just given myself an extra week to finish the custom orders.
 10 29 10 inventory

I can’t leave this post without a few words about Project Runway!  I’m not going to spoil it for you in case you’ve got it DVRed, but here’s how I felt about the collections:
  • I’ve already forgotten the stuff in Gretchen’s collection, so I must not be all that impressed.  In the interest of full disclosure, I really don’t like her so I probably blocked it out.
  • I liked the colors Andy chose and I liked a lot of the looks, but really?  Only two colors for the whole collection?
  • I love Mondo and I loved most of his collection (those buffalo plaid high-waist pants were AWESOME), but some of it was crazy in a bad way.  The bejeweled oversized sweater thing with leggings that was at the beginning of his collection was so not good.

Is anyone else swamped right now?  Is this just a little taste of the holiday season?

Tuesday, October 26, 2010

Starting an Email Newsletter

10 26 10 email signup sheetAt the Rocky Ripple Festival, I set out a sign-up sheet to gather customer’s email addresses.  I ended up with ten or so, and that page has been gathering dust in my stack of business stuff until last night, when I finally got around to setting up an email newsletter.  Go ahead, sign up – the signup box is on the left side of this page!
 
I decided to use Mail Chimp to manage my email newsletter.  It’s free for up to 1000 subscribers and 6000 total emails sent per month.  In my wildest dreams I’ll have 1000 subscribers anytime soon, but it never hurts to plan ahead!

10 26 10 mail chimp
The setup process is super simple.  After signing up for the free option, I manually entered all of the email addresses from my sign-up sheet into one list.  Next, I designed my first newsletter.  I just chose a pre-designed template, but you can make yours from scratch if you’d like.  I’m pretty crazy about having all of my stuff match, so I went with the simplest one and added my logo to make it coordinate with the blog and my shops.  There is an Etsy predesigned option that imports listings from your shop using Etsy API, but I wasn’t crazy about how mine turned out using that option.

Last, you send that bad boy out and wait for people to read!  Evidently I’ll get lots of stats once it goes out – who opens it, who clicks through, who subscribes and unsubscribes.  I also added that little sign up widget on the sidebar of the blog – you just copy and paste the html from Mail Chimp and add it through your blog editor (instructions are here to add it to Blogger, and here to add one to your Facebook page).
10 26 10 mail chimp 2
It looks like there are some really cool features.  You can split your campaign into two groups so you can see if you get a different response if you send it in the morning vs. the evening.  You can also just send your email to part of your subscriber list, or just send a text email to everyone.  You can also have Mail Chimp automatically send a tweet or post to Facebook when a new email campaign goes out.

Overall I’m pretty happy with it.  The site seems kind of sluggish sometimes, and the editing reminds me of Blogger’s image and text editing (not a fan, as we all know).  It will be interesting to see if it helps business at all.  I think it may be kind of like blogging – it takes a few times to get your flow.

I realized this weekend that I’ve been sharing a ton about how I’ve been running bobaloo!, but I haven’t been sharing what I’ve been making!  Here’s some pictures of some new stuff I’ve been stitching up.  See something you like?  Go grab it in my Etsy shop, or check out my brand-spankin’-new Cargoh shop!
10 26 10 product collage
Now go sign up for the newsletter!  Have a great day!

Friday, October 22, 2010

Finding My Stride

10 22 10 sms screnshot top
Remember a while back I mentioned I was going to be linked to on a big blog?  Well Tuesday, a link to my Fancy Burp Cloth tutorial was on Sew, Mama, Sew!  If you’re not already a Sew, Mama, Sew devotee, get your booty over there and take a look.  The tutorial was part of a roundup by the lovely Shannon of luvinthemommyhood, another great blog.  If you sew, definitely take a look at all the wonderful projects on that post – I can’t wait to try some out.
10 22 10 sms screenshot
I feel much less stressed about getting products ready for next weekend’s Irvington Halloween Festival than I did when preparing for my first fair.  Part of the reason I’m more relaxed is that I have all the first-time stuff done – signs, tags, sign up sheets, etc. – and I really just have to focus on sewing.  I also have a better idea of what selling at a craft fair is all about, so I don’t have that big fear of the unknown.

Most importantly, I’m finally finding a rhythm to working at home with two kiddos around.  I typically cut and pin fabric at the island in my kitchen, which is nice and big and high enough that I don’t have to stoop over.  This means I can set Bridget up with a craft project at the kitchen table, let Graham empty out the cabinets, and get a good amount of cutting ready.  That way, when they go down for their naps, I’m ready to sew like crazy.  I’ve also been trying to get in a good hour of sewing right after they go to bed at night.

10 23 10 b coloring
The administrative and computer stuff is easier to squeeze in here and there.  I can usually work on my inventory spreadsheets and accounting stuff in short bits throughout the day when the kids are playing.  I’ve started writing blog posts at night and setting them to publish in the mornings.  This week, I got all of my Etsy listings ready on Sunday night – that way I have been able to list stuff twice a day with a couple of clicks.

(If you're an Etsy seller and don't know how to get your listings ready in advance, here's a great forum thread on how to do it!)

Luckily I have an amazing husband who is always up for entertaining the kids when he’s home.  Saturdays and Sundays (and some evenings) I work really hard in my sewing room.  I usually save photo shoots for those days, too, so I know I can get all the pictures done at once.

I’m not saying I’m great at time management – my kids probably watch more cartoons than they should, and the poor hubs probably forgets what I look like – but I am for sure improving.  One thing I’m really working on is shutting the computer and staying away from the fabric from about 5 pm until the kids go to bed.  We have always made it a point to sit down for dinner, so it just makes it less stressful if I’m not trying to squeeze in work at the same time.

What do you guys do to manage family time and business time?  Finish your listings in the shower?  Hand sew while vacuuming with your feet?  Do share!

Tuesday, October 19, 2010

Cargoh.com and Windows Live Writer

After all that yammering about Artfire last week (I did sign up for the free option), I ended up going a completely different direction and opened up a shop on cargoh.com.  Never heard of it?  Don’t worry, neither had I until a week or so ago.

10 19 10 cargoh homepage

Cargoh is based in Vancouver and is a new marketplace still in beta.  They are evidently trying to cultivate a hip, indie vibe.  Now I’ve never categorized myself as the hipster type, but I was sucked in because the shops are juried – you have to apply and be approved to sell on Cargoh.  I can’t resist a challenge and I just HAD to know if my stuff was good enough to pass.  Right now Cargoh has no monthly fees; the only fee is 3.5% of sales.

I applied late Friday night and got my approval letter early this morning.  I set up my shop, which was easy enough – I used some of my information from Etsy and just redesigned my banner and avatar for Cargoh’s size specs (which includes MASSIVE shop banners, btw).  I have a few listings up now and I’ll probably add a few more this week.

10 19 10 etsy shop 10 19 10 cargoh shop

For comparison’s sake, these are the front pages of my Cargoh shop and my Etsy shop.  The Twitter feed and Facebook widget on the right side of the shop on Cargoh are kinda nice, and I like the overall look of the site.  It’s way better than the slightly janky feel over at Artfire.  I guess Cargoh REALLY annoyed some Etsy sellers last month by closing down some established shops – if you want more on that story, check out this Etsy forum thread.

I’ll keep you updated on how things go at Cargoh.  If you’re interested in the listing process (which is pretty simple) or any other specifics about starting up a shop, leave me a comment and I’ll give you more details.
This is also my first post using Windows Live Writer, which is a free program you can find here.  It’s basically set up like a word processor.  You type up the post, add links and pics, and export it to Blogger.  I’ve been looking for a better blogging solution because adding pictures and links on Blogger sometimes makes me want to stab myself with a pencil. 

I’ve got loads of new stuff to work on this week.  The results are in for the Epi Pen case product testing, so I’ve got my redesign all sketched and ready to be sewn.  I’m also working on some reusable snack bags and a cute hanging hair stuff organizer for the bajillion barrettes Bridget has accumulated.  Have a great week everyone!

Friday, October 15, 2010

Debating an Artfire Store... Hmmm.

Before I went on vacation, there was a decent amount of buzz about the deal Artfire was offering for a pro membership.  If you haven't seen it, Artfire is pretty much a direct competitor to Etsy.  However, it's pretty new so it doesn't have the traffic and recognition that Etsy does. 

etsy vs. artfire artfire front page screenshot

The biggest benefit of Artfire?  It uses a monthly subscription fee, not fees to list or renew items, and no percentage of sales fees.  The deal that was running in September was $5.99 a month for a Pro membership (it's now $9.95/month).  Etsy's search function displays the most recently listed or renewed items first in the results, so sellers really have to constantly renew to get to the top of the searches (20 cents per renewal adds up fast).

It looks like Artfire also does a much better job of getting its shop listings at the top of Google Shopping results.  Considering my recent obsession with SEO, this totally appeals to me.  More views means more sales, which means happy me.  And I hear their seller support is amazing - they have people that actually answer phone calls, for heavens sake!

etsy vs. artfire Etsy front page screenshot

However, I LOVE the look of Etsy and I'm certainly not closing my shop there anytime soon.  I think it's clean and polished, while Artfire kinda seems like a cheap imitator.  Also, people have heard of Etsy, which counts for a lot.  At the Rocky Ripple Festival I had tons of people ask me if I have an Etsy shop.  The fees stink, no doubt about it, but with my pricing structure I can absorb some fees (and Etsy has to make money somehow).  It's just REALLY tempting to try out a cheaper option.

My sticking point is the time I'd have to devote to maintaining two shops.  Luckily Artfire has an importing tool that allows sellers to import all of their Etsy listings.  Evidently you do have to change up your titles and listings a little bit because Google Search will ignore duplicate listings, making both listings disappear from Google search results.

Brother PC-420 PRW Limited Edition Project Runway Sewing Machine
I'm leaning toward trying it out through the holidays.  My marketing budget is super tight, so the $30 I'm going to have to shell out really chips in to some of the things I've been planning on buying (like a pop-up tent for shows and and a stronger sewing machine- look, isn't this one pretty?).

Here are some good forum posts if you want some more opinions.


Generally, I think Artfire shops are getting the traffic, but not necessarily the sales.  Etsy is getting less traffic per shop, but more sales.  I think Artfire is at a turning point now - it could potentially grow quickly due to all the sellers who want to minimize fees, but if there aren't enough buyers, it's just going to fizzle.

Any opinions?  I go back and forth on this by the hour!  Artfire does have a free membership, but it doesn't include the Etsy importer - should I just retype all those listings to try Artfire for free?  Am I devoting too much brain power to this when I should be baking cookies or something?

Tuesday, October 12, 2010

Managing an Etsy Shop and a Blog While on Vacation


I spent last week on a cruise to the Bahamas, and boy oh boy am I finding it tough to get back to work.  The head cold I brought home with me isn't helping much.  I don't get sick very often so when I do I'm a pretty big baby about it.

Anyway, I thought I'd share with you guys how I handled the shop and the blog while I was away.  I think it's a bad idea to broadcast across the internet that my house will be vacant for a week, so I didn't really mention it before we left.  I'm sure an industrious fabric thief could have figured out that I was gone and ransacked my stash, but why make it easier? 

I managed to completely avoid the internet (partially due to the fact that I haven't bought that smart phone yet), but I didn't completely abandon things either.  It did take some advance planning - I was SUPER busy the couple days before our trip.

I typically post twice a week, on Tuesdays and Fridays.  We left for our trip on Sunday and came back Friday evening, so I wrote two blog posts ahead of time - a book review and a tutorial on embellishing a wooden tray.  Then, I set Blogger to publish the posts Tuesday and Thursday, like so:
  • After finishing your post, click "Post Options" at the bottom left of the editing window.
  • On the right side under "Post date and time", click the "Scheduled at" radio button.
  • Enter the date and time you want the post to publish
  • Click the orange "Publish Post" button.
There you go, easy as pie!  I will admit, when I wrote the first one I was afraid to click the "Publish Post" button.  I ended up going back and publishing it when I wrote the second one.  A good way to check and see if the posts are scheduled correctly is to go the "Edit Posts" section (where all of your posts and drafts are listed) - the ones you scheduled will have a scheduled to post date instead of saying "draft".


Once I took care of the blog, I moved on to getting my shop in order.  I added a line to the very beginning of my shop announcement (at the top of every Etsy shop) that stated I'd be away from the shop from October 3rd through the 8th.  I added a similar note to the message to buyers that is automatically sent by Etsy after every purchase.  You can edit both of these in Your Etsy under Shop Appearance.

I also didn't want to completely abandon renewing items.  I recently read about the Statsy Clockbot in this Etsy forums post, and it's AWESOME!  You schedule listings from your shop to renew on a date you specify, down to the time.  It even has a pop up list of all your listings (with thumbnails!), making it super simple.  Typically I list new items or renew twice a day, but while I was on vacation I just scheduled one renewal a day at my peak traffic time (9 am).  It was so easy and fast.

Now that I've tried out all these automating tools, I think I'll take advantage of them more often.  I typically have the most time to sit down at the computer after the kids go to bed, so I'm thinking I should plan on writing blog posts at that time and just scheduling them to post later.  I'm pretty sure I'm late to the scheduling blog posts party, but I'm totally on the bandwagon now.

This post got a little out of hand - thanks for sticking with me!  Here's the obligatory taking-a-picture-of-ourselves-on-vacation shot for you!
PS - If you're looking for a good book, I read The Lonely Polygamist while we were gone and it was really really good.  I must have read a review of it somewhere (probably People magazine) because evidently I requested it from the library, and as luck would have it it showed up right before we left.  Loved it.

Thursday, October 7, 2010

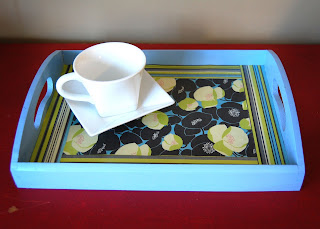
Tutorial! Super Easy Embellished Tray


My monthly Craft Night got cancelled last week after I had already bought my supplies.  I really wanted to make an embellished tray, so you guys get a tutorial and we can have our own virtual Craft Night!  I am by no means a Mod Podge expert (unlike Amy or Emily), but I do love the stuff.


First up, you'll need some supplies.  I bought everything at Michael's.
  • A plain wooden tray (this was about $4 in the unfinished wood section)
  • A can of spray paint (more on this later)
  • Mod Podge
  • Paintbrush
  • Fancy paper (the paper I used was heavier weight, like cardstock - did you guys know there's Amy Butler paper?!  You scrapbookers have the coolest stuff!)
  • Scissors
  • Spray sealer (optional)

1.  Spray paint your wooden tray so it's nice and even.  I knew I was going to cover the inside bottom part with paper, so I didn't worry about spraying that too well.  I used Krylon spray paint for this and it took three coats for it to look good.  In my opinion, the Krylon paint doesn't hold a candle to the Valspar spray paint, which I used for my craft fair signs.  The Valspar paint covers so much better and is glossier.  Moral of the story - get the Valspar if you can.  My Michael's didn't have it, but I bought Valspar spray paint at Home Depot last time.


2.  Let the tray dry, then pick your paper - I picked two prints from this pack of 12 x 12 Amy Butler paper.  The inside of my tray is about 13" wide, so I'm using one main print then adding a stripe border.  To cut the main paper to size, line up the edge of the paper on one long edge of the tray.  Holding that in place, push the paper against the opposite long edge to make a crease, just like in the picture.  Then, take the paper out of the tray and cut along the crease. 

3.  Paint a layer of Mod Podge on the tray bottom - don't be stingy, but don't glob it on or it just makes a mess.  Lay your cut piece of paper in the middle of the tray bottom and smooth out any bubbles.


4.  Next up - the border.  The stripes made it super easy for me to cut even strips of paper to make the border - they're all 1 1/4" wide and I just cut along a stripe.  You may want to use a paper cutter like this one to make nice even cuts, or use a ruler and draw your straight lines before cutting.  Cut 4 strips, all the same width.  Add another layer of Mod Podge on each long edge of the tray bottom and press on two of the border strips as shown.  Smooth them out like you did with the main paper.


5.  Use the same method you used with the main paper to cut the short-side border strips to the right size - just lay them in the tray where they go and crease where they need cut.  Trim them down, paint some Mod Podge on the short sides where the border goes, and glue 'em on.


6.  Paint on a nice, even layer of Mod Podge over the entire tray bottom.  You can see in this picture how sometimes the paper gets a little bumpy and uneven - don't worry, it usually smooths out as it dries.  Let it dry and add another coat for good measure.


7.  All done!  Now aren't you proud of yourself?

I decided to spray mine with a clear sealer because with two kids in the house, durability is pretty high on my priority list.  I also am not great at painting Mod Podge evenly, so it covers up my brush strokes a little bit.

If you make one, I'd love to see pictures! 

Tuesday, October 5, 2010

Crafty Business Book Review - Craft Inc.

I've been trying to read up on business topics, particularly crafty marketing and social media.  I thought I'd kick it old school and write a book report everyone once in a while on a recent read in case you're as addicted to books as I am.

Craft, Inc.: Turn Your Creative Hobby into a BusinessFirst up is Craft Inc. by Meg Mateo Ilasco.  It's pretty amazing how much things have changed internet-wise since this book was published in 2007, but this one still has a lot of pertinent info.  The information about the legal and paperwork-y things that need to be done to establish a business is awesome - there's even a great checklist listing the steps to starting up.

The section on sourcing raw materials was a plus for me.  I'd love to be able to buy fabric wholesale soon and it was nice to get a general overview of the process so I have an idea of where to start.  Most of the advice about production (like setting goals for yourself and making multiple identical items) seemed pretty obvious to me, but it is good advice nonetheless. 

There is some great advice about craft fairs including my favorite - a checklist!  Establishing on online presence is also covered but you'd probably be better off referencing a more recent book for the most useful information.

All in all, I'd definitely recommend this one.  It's comprehensive and takes a new business from first idea all the way to becoming a full-fledged big business with employees.  I'll probably check out Meg's newer book, Creative Inc., because I really like her style.  A Craft Inc. Business Planner also popped up on Amazon when I was searching for this book - has anyone seen that?  I'll have to check and see if my library has it.

If you have any book suggestions please share with the class!
Related Posts Plugin for WordPress, Blogger...